
Ring and bracelet sizing information
Ring Sizing Guide
Ring Sizing Guide
Rules to size by
🌿 Rule #1: Rings should fit firm—not too tight, not too loose. They should go on with a little resistance (not a struggle) and come off with a little resistance (not a struggle).
🌿 If removal is tricky, a spritz of Windex works wonders.
🌿 Rule #2: Trust your fit preference. Some like extra-snug; others prefer a looser, gently spinning ring.
🌿 Rule #3: If you’re between sizes, choose the larger—only go smaller if you truly love a snug fit.
Best fit (quick rule)
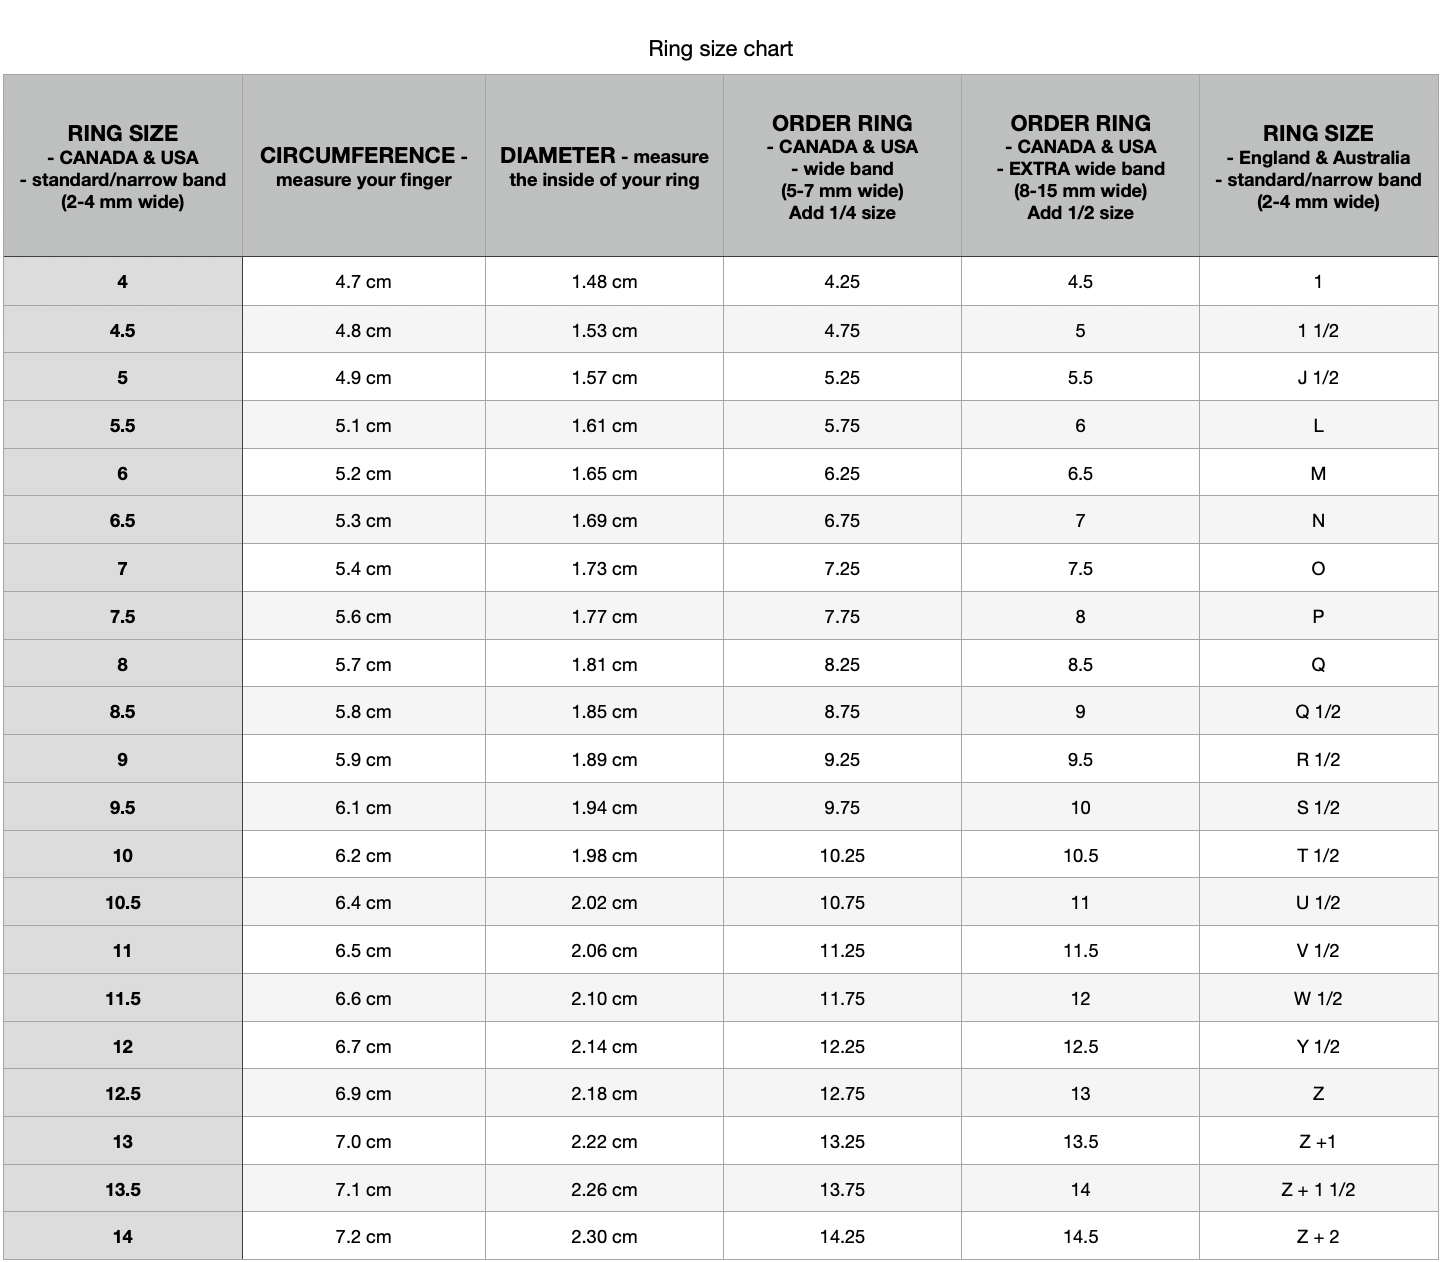
🌿 For the most accurate result, measure or try a ring in the same width as the one you’re buying.
🌿 If your reference ring is narrow (2–4 mm) but you’re ordering a wide band (5–7 mm): go up ¼ size.
🌿 If you’re ordering an extra-wide band (8–15 mm): go up ½ size.
🌿 Square bands feel a touch looser: size down ¼–½ size depending on width.
🌿 Ring sizing is part art as well as science—when in doubt, ask us.
Ways to measure your ring size
🌿 Best accuracy — ring sizer
A reusable plastic “zip-tie” ring sizer is inexpensive and very accurate. Wrap at the base of your finger so it’s firm, not tight, then read the size.
🌿 Measure your finger (no sizer)
Wrap a thin strip of paper or soft tape around the base of your finger.
Mark the overlap and measure the length in mm (circumference).
Compare to our Ring Size Chart.
Tip: also measure over the knuckle; if it’s larger, base your size on the knuckle for an easy slide.
🌿 Measure a ring you already own
Measure the inside diameter (mm) across the widest empty space—don’t include band thickness.
Match that diameter to our Ring Size Chart.
For best results, use a ring in the same width as the piece you’re ordering.
🌿 Buying a gift?
Measure a ring they wear on the same finger/hand (sizes differ between hands). Be discreet—be accurate!
Do’s
🌿 Measure a few times across the day and in different conditions; then choose the size that felt best overall.
🌿 Fingers are largest in the evening—a good time for a final check.
🌿 Measure the exact finger you’ll wear the ring on.
🌿 If you have larger knuckles, measure both knuckle and finger base and choose a size in between.
Don’ts
🌿 Don’t measure in very hot or very cold weather—heat swells, cold shrinks.
🌿 Don’t measure right after salty foods (swelling) or even lots of apples (can briefly shrink).
🌿 Don’t measure straight after a workout—wait until you’re at rest.
🌿 Don’t rely on print-at-home ring sizers—printer scaling is rarely exact.
Bracelet Sizing
Chain Maille & Panel Bracelets
What they are
🌿 Chain maille — handmade chains with a clasp.
🌿 Panel — softly hinged Argentium silver panels with a clasp.
How to measure (measure your wrist, then add for fit)
Wrap a soft tape just below the wrist bone (or use string, then measure).
Add your preferred ease:
– Snug: +¼″ to +½″ (+0.6–1.3 cm)
– Comfortable: +¾″ to +1″ (+1.9–2.5 cm)
– Loose: +1¼″ (+3.2 cm)Choose the nearest length. A comfortable fit usually leaves one–two fingers of space.
See chart: Chain Maille & Panel Sizing Chart
Chain Maille & Panel — Length Guide (use your wrist)
How to choose length:
Order length = wrist measurement + fit add-on
| Fit | Add (inches) | Add (centimetres) |
|---|---|---|
| Snug | +¼″ to +½″ | +0.6 to +1.3 cm |
| Comfortable | +¾″ to +1″ | +1.9 to +2.5 cm |
| Loose | +1¼″ | +3.2 cm |
🌿 Tip: A comfortable fit usually leaves one–two fingers of ease between bracelet and wrist.
Cuff Bracelets
What they are
🌿 A stiff oval with a small side opening—slide on from the narrow side of your wrist.
How to measure (aim for “second-skin” snug)
Measure your wrist just below the wrist bone.
Most people prefer a snug add-on (see chart guidance), so the cuff sits secure with minimal movement.
If your knuckle area is prominent, note wrist shape; choose the size that allows a comfortable slide on/off without prying.
See chart: Cuff Sizing Chart (oval inner dimensions + recommended wrist ranges)
Care note: Avoid pulling a cuff wide open; slide it on sideways to maintain shape.
Cuff Bracelets — Size Chart (oval interior)
| Size | Inside diameter | Opening | Inside diameter (in) | Opening (in) |
|---|---|---|---|---|
| Small | 5.3 cm | 2.5 cm | 2.1″ | 1.0″ |
| Medium | 6.0 cm | 2.8 cm | 2.4″ | 1.1″ |
| Large | 6.4 cm | 3.1 cm | 2.5″ | 1.22″ |
| XLarge | 6.8 cm | 3.5 cm | 2.7″ | 1.4″ |
| XXLarge | 7.2 cm | 4.0 cm | 2.8″ | 1.6″ |
🌿 Fit note: Cuffs should feel snug, second-skin. Slide on from the narrow side of the wrist; avoid pulling the cuff wide open.
Bangles — Round
What they are
🌿 Solid circles that slide over the hand (no clasp). Offered in Small, Medium, Large, XLarge, XXLarge.
How to measure (measure your hand, not your wrist)
Method A (quick): If you own a bangle that fits, measure its inside diameter and match to the chart (cm).
Method B:
Touch pinky to thumb and bring fingers together as if slipping on a bangle.
Measure around the widest part of your hand (over the knuckles).
Match to the Round Bangle Size Chart.
See chart: Round Bangle Size Chart (inside diameters in cm)
Tip: If you’re between sizes, choose the larger for comfort.
Bangles — Round — Size Chart (inside diameters)
| Size | Inside diameter | Circumference | Inside diameter (in) | Circumference (in) |
|---|---|---|---|---|
| Small | 6.0 cm | 19 cm | 2.4″ | 7.5″ |
| Medium | 6.4 cm | 20 cm | 2.5″ | 7.85″ |
| Large | 6.7 cm | 21 cm | 2.65″ | 8.25″ |
| XLarge | 7.0 cm | 22 cm | 2.75″ | 8.7″ |
| XXLarge | 7.5 cm | 23 cm | 3.0″ | 9.1″ |
🌿 Tip: If you’re between sizes, choose the larger for comfort.
Bangles — Square & Cushion Square
What they are
🌿 Bangles formed in a square/rounded-square profile that still slide over the hand.
How to measure
Use the same hand measurement method as round bangles.
Match to the Square Bangle Size Chart (our chart accounts for the different interior shape).
See chart: Square Bangle Size Chart (interior size in cm, matched to hand measurement)
Bangles — Cushion Square — Size Chart (inside diameters)
| Size | Inside diameter | Inside diameter (in) |
|---|---|---|
| Small | 5.5 cm | 2.2″ |
| Medium | 6.0 cm | 2.4″ |
| Large | 6.5 cm | 2.6″ |
| XLarge | 7.0 cm | 2.75″ |
🌿 Fit note: Square bangles feel a touch looser than round; if you’re between sizes, many people size ¼–½ size down.